 We’ve been mapping out the time to try our first Mr. Beer brew and I’m happy to report that Brew-Day has finally arrived! I’ll try to take you step by step through the process and since I know pictures are more interesting than words, stay tuned for lots of pictures.
 STEP 1: Read. Now I’ll admit I’m not a big fan of reading instructions, but at least for my first time, I thought it was a good idea. If you’re like me, you’ll be happy to know that there’s really not a lot of reading necessary to get started and Mr. Beer even includes a 4-fold pamphlet that will give you everything you need to get started (and finished). There is a larger book as well with more details, but I decided to be a little more hands-on and go with the pamphlet.
 STEP 2: Knowing how sticky malt-extract can be, I decided to soak my malt extract can in some hot water to loosen it up. IMPORTANT: Your yeast packet is Under the lid of the extract can so be sure to REMOVE IT BEFORE SOAKING. I pretty much just left the can soaking while I continued on.
  STEP 3: This is of course an optional step, but since I grow my own hops and had some whole-cone flowers from my 2010 crop in the freezer, I defrosted them to use in today’s brew. As you can see I’m using the Mr. Beer American Devil IPA and what you can’t see is I’m adding in Nugget & Cascade cones.
 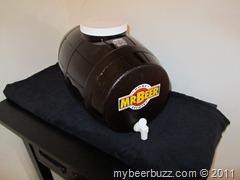 As part of step 3 I also looked around for an ideal home for my Mr. Beer fermenter. Keep in mind this needs to be a location out of direct sunlight, a location with steady temps around 68F and perhaps most importantly, a location where it won’t be in the way for the next two weeks of fermenting. In other words you may not want it on your kitchen counter for 2 weeks. I decided to add a towel underneath for a little insulation and to catch any spills.
 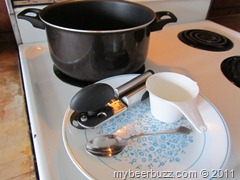 STEP 4: Gather up your stuff and SANITIZE EVERYTHING but the pot (boiling will take care of that)!! As you can see it doesn’t take much. A 3-quart (or more) pot, a plate, a can opener, a metal spoon and a measuring cup. The instructions tell you to fill the Mr. Beer fermenter (with the spout installed) with water up to the 4-quart mark and add in half of a packet of the sanitizer
 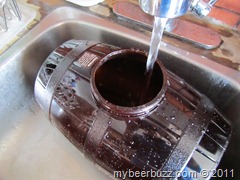 solution (No Rinse cleanser) that came with the kit….mix it up and drop your can opener, spool and measuring cup into the sanitizing solution for 10 mins. I also dribbled some solution onto the plate to sanitize it. This way when you sit your utensils on the plate, they’ll stay sanitized. This is an
  IMP
IMP ORTANT step so do it carefully, follow the instructions and DO NOT RINSE off the solution afterwards (this will mess up the sterilization process). This step is SO important, I even took 4-photos! All kidding aside, any brewer will tell you cleaning and sanitization are the two most important aspects of brewing beer so don’t cu corners here.
 STEP 5: Let’s start Brewing! Slowly mix the booster packet into 4 cups of COLD WATER. Make sure it’s COLD, since the booster solution is not easy to dissolve.
 The booster solution is listed as an optional step, but who wouldn’t want more alcohol and body in their beer. I’m not sure exactly what’s
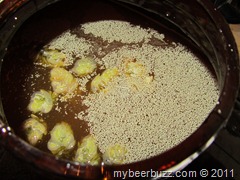
  in the packet, but it seems like it is mostly sugars. As you can see in the 2nd photo (right), it is not easy to dissolve and it will take close to 5 minutes of stirring to dissolve it. Take your time add it to the water SLOWLY and dissolve it completely.
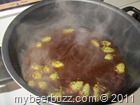
  Next you simply bring the water to a boil, and remove it form the heat, open the HME (Hopped-malt extract) can with your sanitized can-opener and pour it into the water/booster mix. Using your sanitized spoon (that you remembered to lay on the sanitized plate after mixing the booster), get every last drop of HME out of the can. It was at this point I added in the hop cones and let them steep for 5 minutes. I used about a cup of hop cones, which I suspect won’t have much effect on the final brew (more on that after we bottle and taste). The three photos below show the boil, the addition of the HME, and the addition of hops.
  |  |  |
What you have in the pot now is the Wort (unfermented beer).
 STEP 6: Fermentation!
 I filled the fermentation vessel up to the 4-quart mark with water, allowed the wort to cool slightly, added the wort to the fermentation vessel, topped it off with cold water to the 8.5-quart mark, mixed it well.…and then the easy part. Tear open your yeast packet, sprinkle it over the wort, let it sit for 5 minutes, stir it one more time and put on the lid. Remember….Keep the lid ON until you’re ready to bottle (1-3 weeks). Don’t be tempted to peek inside because you’re only making it easy for bad bacteria to get into your brew.
 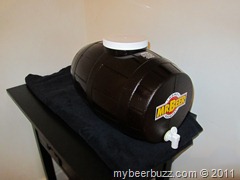 I placed my Mr. Beer fermentation vessel in the location I prepared at the beginning of the process and THAT’s IT! I plan to allow it to ferment for at least 2-weeks, depending on how it is behaving. I checked back a few hours after filling the vessel (with a flashlight because it’s pretty hard to see into the dark brown fermenter) and found the tell-tale bubbles of fermentation! I’ll follow up with some posts in a few weeks as the beer progresses and I bottle it so STAY TUNED!
 Mr. Beer Beer of the Month Club Receive everything you need to keep you brewing great tasting beer all year long.

Nice post. Surfed in here from a Facebook post by Mr. Beer. I've brewed for a few years now & except for the few batches that somehow didn't ferment (I suspect bad yeast) or were somehow contaminated, I've loved it all.
ReplyDeleteJudging by some of the ads, it looks like you're in the Scranton/Wilkes Barre area. I'm a little south in Delaware. I've wanted to grow my own hops for a while. Is it difficult?
Welcome Joe. I've been watching and I still see evidence of fermentation....of course it's got a long way to go (just brewed 3 days ago).
ReplyDeleteYep I'm in the WB/Scranton area. Hops are pretty easy to grow, they just need something to grow on. I have a flagpole with wires and I plan to expand that if time allows to a larger wire. Some people grow them up the side of a building or arbor. They grow pretty easily...so far the only tricky part I've found is harvesting at the right time. Try it out. The Rhizomes (root sets) are pretty cheap. They like lots of manure and away they go. Not sur ehow far down into DE you are, but I'm betting your climate is warmer too.
I'm brewing with my kit for the very first time.. I opted for the Vienna Style Octoberfest. Its been just over a week now and I drew off a very small sample.. Its not sweet and a bit cloudy. In the instructions, there is a tip that suggests for more flavor, let it stay 2 weeks before bottling. So that is the plan.. Thought I read someplace that any cloudiness means let it sit longer.. This was a very helpful post..
ReplyDeleteThank you....It's ben a lot of fun just watching it ferment. I read the same....I plan to ferment for at least 2 weeks (maybe more), and yes the tip you mention is in one of the books. Is there activity (foam on the top and bubbles rising from the wort)? It's probably still fermenting.
ReplyDeleteI started a batch last Sunday. It was the Pilothouse Pilsner. I added a can of their Creamy Brown UME and Cascade Pellet Hops to boost the IBU (I've been on an IPA kick lately). It should be ~6.9 ABV so I'm going to let it ferment about 3 weeks. It'll probably need to condition for a couple months, too.
ReplyDeleteI just tried a little & it's still cloudy but tastes good. My concern is that it bubbled & foamed well for a couple days but now it doesn't look like anything is going on. I'll update the progress later. Thanks for the info on the hop growing too. I might give it a try this summer.
Joe from DE
Thanks Joe...mine did the same....pretty active fermentation for a day or so then pretty calm. Mine is still tasting sweet after 3 weeks so I plan to re-pitch some yeast and wait another week or so before bottling.
ReplyDeleteMy husband used honey in his last batch and it is so foamy he can't drink most of it. It is also very cloudy. Any suggestions?
ReplyDeleteNot sure Anon....when and how much did he add? I'm far from an expert on this but I suspect there's too much sugar in the mix. How does it taste? Did he bottle yet?
ReplyDeleteI am on my day 7, my of the Canadian Brew, was Foamy and active for maybe 3 days, even when it was most active, it wasn't as active as most images I Googled. Did I do something wrong? or do I need to re-pitch some yeast?
ReplyDeleteI'm no expert, but I would say it's critical to maintain the constant fermentation temperatures. I'm sure you're probably OK. I'd give it a few more days and maybe taste it. If it tastes like it's no ready, It can;t hurt to re-pitch some additional yeast.
ReplyDelete